How to draw a pattern on wall ?
INTRODUCTION - How to Make the Pattern - Mod Optic brings a strong perspective to entertainment spaces like living...
INTRODUCTION
How to Make the Pattern
Mod Optic brings a strong perspective to entertainment spaces like living rooms, kitchens, and bathrooms, but it can also add a sense of personality to more private spaces like bedrooms. Its versatility of scale means it works well on both small and large walls to add different levels of drama, as the space demands.
The four colors this pattern requires (including the base) means there‘s plenty of space to play with lights and darks, dialing the contrast up for a bolder statement, or down for a subtler one.
STEP 1
Find the Right Tape
Find the right tape for your project. We used ScotchBlue™ Painter’s Tape Multi-Surface with Advanced Edge-Lock™ Paint Line Protector and ScotchBlue™ Painter‘s Tape Delicate Surfaces with Advanced Edge-Lock™ Paint Line Protector.
STEP 2
Choose a Base Color
Choose a base color (or use an already painted surface), and prepare the surface for the pattern. (Check out our Guide to Taping for prep tips.)
STEP 3
Tape Off Surfaces
Tape off any surfaces that you want to keep paint-free, like baseboards, tile, or corners.
STEP 4
Make evenly spaced guide marks on your surface with a pencil to help you plan for a grid. (In our example pattern, the grid is 15 inches, but you can scale the pattern up or down to fit your space and style.)
STEP 5
Combine Guide Marks to From Lines
Join your guide marks together with straight lines, using a ruler or other straightedge.
STEP 6
Use Mod Optic Pattern as a Guide
Once you have the basic grid laid down, refer to the Mod Optic pattern as a guide, and use each paint color to mark each section of the grid where it belongs.
STEP 7
Tape off Areas for First Color
Tape off the areas for your first color. We recommend ScotchBlue™ Painter’s Tape Delicate Surfaces with Advanced Edge-Lock™ Paint Line Protector.
STEP 8
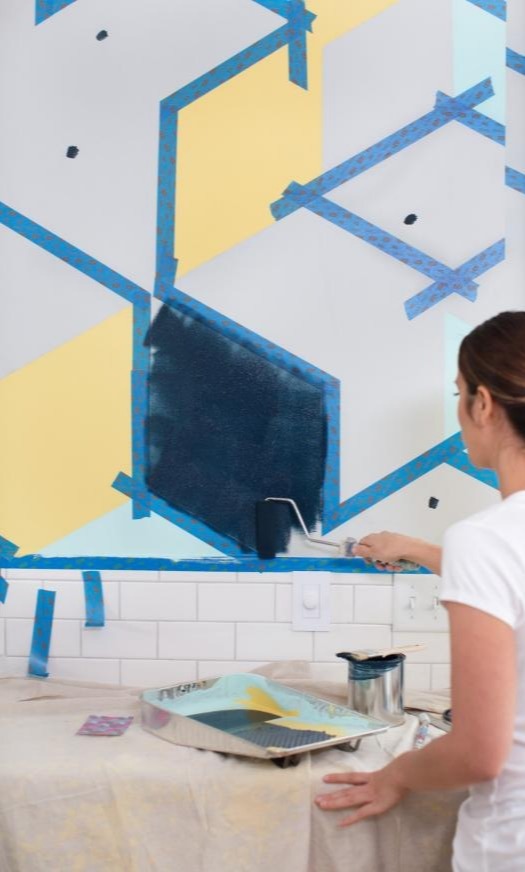
Apply and Dry for First Color
Paint your first color and let it dry at least 24 hours.
STEP 9
Remove Tape
Slowly remove the tape from the first color, pulling it back on itself at a 45° angle.
STEP 10
Tape off Areas for Second Color
Tape off the areas for your second color.
STEP 11
Apply and Dry for Second Color
Paint your second color and let it dry at least 24 hours.
STEP 12
Remove Tape
Remove the tape from the second color.
STEP 13
Tape off Areas for Third Color
Tape off the areas for your third color.
STEP 14
Apply and Dry for Third Color
Paint your third color and let it dry.
STEP 15
The Big Reveal
Once you're done painting, carefully remove your final tape strips to reveal the finished design.